
Do you work with balls of yarn? If so, don’tcha just HATE when that sucker flip-flops and rolls all over the place with each “pull” of the yarn? Not only does it provide more temptation than your dog or cat can withstand, every dust bunny in sight jumps on board that ball for a ride! Heck, even skeins can be a pain in the toukis to manage sometimes!
There are all sorts of products out there on the market to help with the dilemma… yarn bowls, yarn holders, yarn dispensers, yarn bags… It all makes my head spin, honestly! I think the yarn bowls are beautiful, but for me, just not very practical. Portability is a big issue for me, as I like to take my big balls (of yarn, y’all, of Y-A-R-N) with me on the go. The bags and dispensers accommodate mobile hookery, but let’s face it…. many of those products are overpriced. Well, maybe they’re not OVER-priced, but I have a hard time paying good money for things I can DIY… (or is is DIM?) At any rate, I’d rather spend my money on more yarn or gadgets that I don’t have the time, energy, or know-how to make myself 🙂
So I started looking for a DIY (DIM) solution. I have seen people use Clorox Wipes containers, but I didn’t have any on hand. What I did have though, were baby formula containers! Another perk of having an 8-month old granddaughter who spends lots of time with Nana 🙂
After some trial and error, I came up with a finished product that fits the bill for functionality and gets an A+++++ for total badassery and coolness! And I thought, why not share it with a few of my closest friends?!
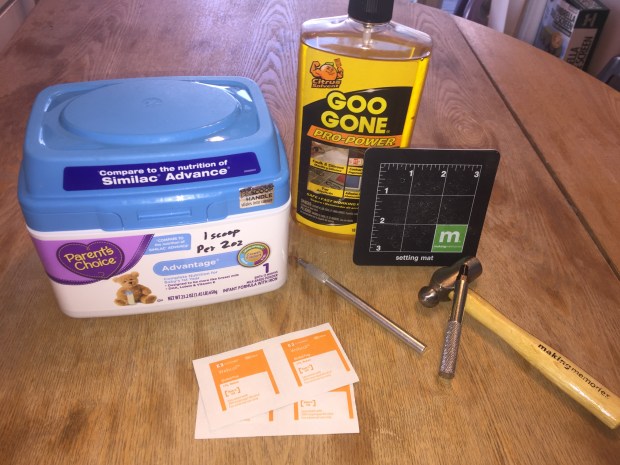
What you’ll need
Formula container
Adhesive remover (I used Goo Gone)
Hole punch that can reach the center of the lid (I used my old scrapbooking hole punch from Making Memories)
exacto knife
rubbing alcohol
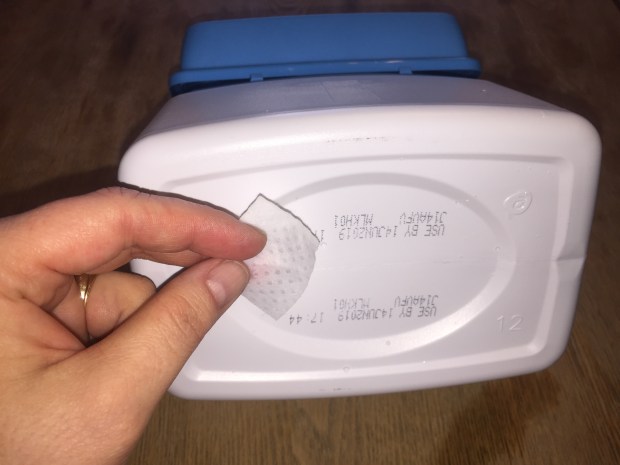
First thing’s first… that label has got to go! Peel off as much as you can by hand, and you can even try using dish soap and warm water to get more of the label off. As a matter of fact, ya gotta wash the formula dust out anyway! I found, though, that some of that blasted adhesive residue was hanging on for dear life no matter how many times I washed it. I even tried rubbing alcohol, but it didn’t help either. So why is it on the supply list, you ask? Well there is a use for it in one of the later steps 🙂
Anyway, I dug around under my kitchen sink, and I said a silent prayer of thanks to the Lord and the previous owner of my house as I discovered a big fat bottle of Goo Gone that was left behind. A few drops of that liquid gold did the trick! Of course, though, feel free to use whatever method floats your boat for removing that sticky business.

Here’s where the alcohol comes in… You might notice your container has some factory stamped information on the bottom or sides. If you don’t care about it, just leave it. But it just bugged the bejeebers out of me. So if your bejeebers feel the same, just take some rubbing alcohol and rub those ink stamps right off!

Once the container is all squeaky clean, wipe it dry. Lay the container down on the back side, with the lid open. You might notice there is a piece of excess plastic on the rim where the formula scoop is stored. (At least the Parents Choice brand from WalMart does). If your brand doesn’t, you’re actually a step ahead already! In all reality this excess plastic probably isn’t going to cause any harm to your yarn if you want to leave it in there, but it just bugged the bejeebers out of me! ( you can probably tell that my bejeebers are sensitive little suckers, LOL)
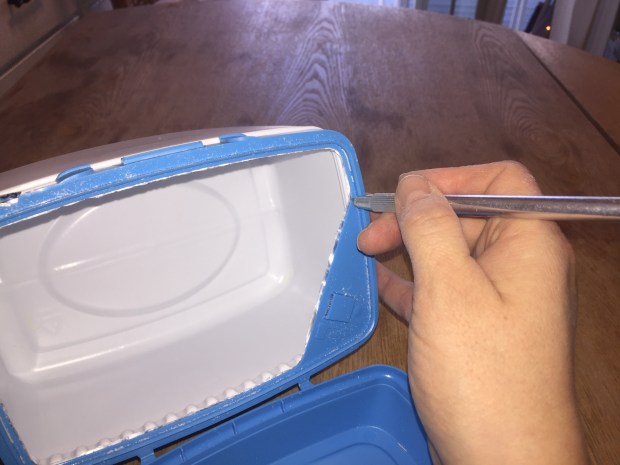
To remove that bit of plastic, just take your exacto knife and gently follow the curve of the rim. Be careful – those exacto knives are SHARP! You don’t need to be cutting your fingers off! If the edge has any jagged areas that could snag your yarn, you could smooth it out with sandpaper, but honestly mine didn’t need it.
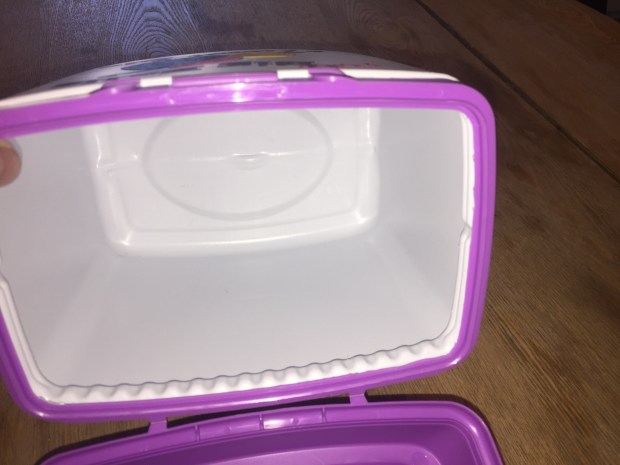
At first I tried pulling the lid and rim off of the container altogether in order to get every little tidbit of foil off… for an hour, LOL! And it finally dawned on me that it wasn’t coming off. See those ridges there? Well, that’s where the container and the lid/rim are molded together at the factory. So then I tried cutting around the top of the container, and it just wasn’t worth the effort. Take it from me – just leave that sucker attached 🙂

Now it’s time to punch the hole in the lid. A standard hole punch of course will not reach in the center of the lid. So I whipped out my trusty old scrapbooking hole punch set from Making Memories. It’s basically a hole punch on a stick that you whack with a hammer… It takes several good whacks to get through the plastic (who knew that plastic was so tough?!), but just think of it as a good way to let out some frustration 🙂
Here’s a chance for a little fun… if you want, you can punch multiple holes to accommodate more than one ball of yarn. Perfect for projects that need color changes, right?

Really, that’s all that you have to do to have a really inexpensive but amazingly functional yarn holder! Now of course, you can trick it out like I did mine with your favorite sticker or decal. If you’d like to order one of the “I Like Big Balls” vinyl decals, just let me know! I am selling them for $10 for the 5 x 5″ size, which will fit the larger formula boxes, and $7 for the 3 x 3″ size that fits the smaller boxes. You can either comment here or visit my Facebook page and let me know the size and whether you want the crochet version or the knit version.

